Showing posts with label Crafty stuff. Show all posts

Wednesday, July 13, 2011

Pencil Fence

Back in March or April, a few giant colored pencils began appearing on the other side of our backyard fence.

DSCN9300

Pretty soon a lot of giant colored pencils were leaning up against the fence. Had a young family of giants moved in next door?

DSCN9302

No family of giants, whew!

Instead, my incredibly creative and talented next door neighbor decided to change out the fence boards flanking her back yard gate.

DSCN9314

I think it’s the coolest thing. Every now and then I’ll head out to work and open my front door to see someone taking pictures from the sidewalk. They sheepishly grin and wave at me, and then they ask: What kind of wood did your neighbor use?

I always reply: “Cedar posts… and a really big pencil sharpener.”

Friday, July 1, 2011

Wicker Basket Planter

This summer we bought a few tomato plants with dreams of beautiful ripe home-grown tomatoes in the late summer. Since we are on a tight budget this summer, it has been impossible to find decent-looking large-ish pots or planters for $5 or less (it’s a very tight budget!) and as renters, I didn’t want to dig up the yard to put in a garden. DSCN9451

Then it occurred to me: all I really need is a container strong enough to hold the weight of wet soil and a little creativity. I decided to make Wicker Basket Planters. DSCN9441

The other day, I picked up a few sturdy wicker baskets at Goodwill. (Remember my quick trip to “William’s Boutique”) I bought a large basket for $2.99, and turned it into a planter in about 20 minutes. Here’s how:

Supplies

  • One wicker basket*
  • Glue gun (Low temp is best, but high temp will work)
  • Heavyweight Garbage bag – Make sure the circumference of the bag will accommodate the basket. If in doubt, measure or open the bag and try to pull it up over the sides of the basket.
  • Potting soil
  • A plant or two

1.  Fit a heavy duty garbage bag into the bottom of the basket, and fold the top down until the bag height is just a little taller than the sides of your basket. The fold should be to the outside of the bag so when the bag is in the basket, the folded plastic is between the bag and the basket. (In the picture, the grey thing is the handle tie of the bag.)

DSCN9440

2.  Using a glue gun, apply a blob of glue to one spot on the inside edge of the basket. For the rest of my instructions, I’ll refer to this point as North. My North point was under the handle.

Apply a blob of glue to the opposite side of the basket (South) and stick the opposite side of the bag to it. My South point was under the other side of the handle.

DSCN9442

3.  Now glue your way around from North to East, then South to East. Repeat going North to West and South to West. This way you don’t have a lot of extra bag bunched up at one spot in your basket, and when the soil goes in the weight won’t pull on the part of the bag that’s already pulled tight.
You should have a little extra bag at East and West. Fold it flat and glue it down.

DSCN9447

--------------------
The nice thing about using hot glue and a garbage bag is that the glue will still stick when it has cooled down a bit, so you have a little bit of working time between gluing and sticking.

I also have to admit a little faux pas at this point. I was sure my 13 gallon garbage bag was big enough, but it wasn’t. If this happens to you, just rip out the bag and start over. My heavy duty 30 gallon leaf bag was perfect.

DSCN9444  DSCN9445
--------------------

4.  Now that your bag is glued around the inside edge of the basket, spread it out across the bottom of the basket. Using a sharp blade, cut two small drain holes in the bottom of the bag underneath where each plant will sit.
DSCN9449

5.  Start filling your basket with potting soil. Using a mix with vermiculite will lighten the weight without compromising your plant. As your soil fills the basket, pull up a little on the sides of the bag to create some slack. You don’t want the weight of the soil to pull on the bag where it has been glued.
Add your plants and finish filling with soil. When the basket is almost full, tuck the excess bag down and hide it under the last 2-3” of soil.
DSCN9450

6.  Move the basket into place (you might have to lift it with two hands if the handle isn’t very sturdy), water thoroughly, and enjoy!DSCN9452


*Select a basket large enough to accommodate the roots of your plant. Generally you can expect the roots under the ground to be about the same size as the mature plant above ground. I figured my basket could hold two tomato plants.

Friday, March 11, 2011

Spring 2011

It has been a long long time since I posted anything here. Did you miss me? Did you wonder what was going on? It’s been a heck of a Fall/Winter, and I just haven’t had the time or energy to do anything but survive for the last few months.

Last October, I shared a bit about Frank’s cancer. He’s still dealing with that and still recovering from all the surgeries last August. This week he finishes up his second to last round of chemo, and the surgical recovery thing has come a long way… just a little bit more to go and he should be done. With that part anyway. He’s getting there.

Last week we finally put the Christmas boxes away. (The tree came down just before Valentine’s Day.) The last of the Christmas cookie tins were washed tonight and maybe I’ll muster up some energy to put them away along with the wreath this coming weekend. Please re-read the last sentence of the first paragraph. I wasn’t kidding.

Anyway, I have some (exciting to me) news to share – I have been trying to come up with ways to earn extra money to help pay the bills. Frank and I miss just enough work each month, and have just enough medical expenses (prescriptions) each month, that our ends don’t quite meet. It bites. It’s depressing. So in January, Rachel and I rented a space at a cute little boutique in town called The Fussy Duck. I wanted a venue to sell my plates, and maybe sell other handmade items as well.

To be honest, it has been slow, but I think I’m still trying to figure out what people want. Risa, the owner, has been a huge source of info and a lot of help. She suggested posting our items on her shop’s page on Facebook, so I have been doing that. Meanwhile, I am dying to show you what we’ve made so far:
sister rock
The “Sister Rock” was the first item to sell. Here are the other things created in our basement Girl Cave:

Pillow cases -
DSCN9243DSCN9242

Duct tape wallets -
DSCN9205

Map picture frames – (I’m still on the hunt for tiny cars to glue to the maps, but here’s what they look like right now)
Miles & Smiles picture frame PacNWMiles & Smiles picture frame

Chip clips – (I love these)
Funky Chip ClipsNM Chip Clips in a jar

Bottlecap magnets -
Bottlecap MagnetssBottlecap Magnets

Femme Fatale Lunch bags/Gift bags –
(Thank you, E.)
DSCN9236DSCN9239DSCN9238

Black & White and pink handbag with a purse organizer insert -
DSCN9221DSCN9227

A Black & White and green handbag with inside pockets -
DSCN9229DSCN9231DSCN9228

Mustache mugs –
DSCN9248DSCN9247

Do you like my mustache?
DSCN9257

One note about the handbags: I have been playing it fairly safe with fabrics as I practiced the pattern. (I actually used fabrics that were purchased to make pillow cases. I couldn’t help it; I just had to try the handbag pattern!) So this week I stopped at my favorite thrift store and bought a couple of big plaid flannel shirts. I’m going to cut them up and piece them together for a cross body hobo bag, following this same basic pattern. I’ll post pictures when the bag is done. I think it’s going to look great.

Speaking of the thrift store, I haven’t forgotten about my mentioning wanting to blog about Thrifty Nesting things. The plan is still there. During down time for my brain (there is no such thing, really) the little gears have been grinding away with thoughts and ideas. On weekends I get a chance to dig in a little and sew and research and glue and compile stuff. I can’t wait to get my next batch of ideas up and running.

Once we’re done with Dr. appointments 4x/week or more (some weeks it’s 2 Dr. appts every day after work,) I will take a big breath and dive in head first into Thrifty Nesting. 

So that’s that.

Please be patient as I try to work my way through everything that has piled up since last August. I can’t wait to get my life back. No, actually, that’s not quite true. My life before all of this was boring and ho-hum. The last 11 months have given me perspective, and I no longer want my dull old life back. I want the life I’ve been wanting all along, and right now I’m using the time to figure out what I need to do next.

Stay tuned!

Tuesday, February 1, 2011

Sweet Valentine's Picture Frame

Sweet Valentine's Picture Frame
I made this picture frame as a gift for my Dad one year for Valentines' Day. The frame was a purple wooden frame on clearance for $.50 at Target and I couldn't pass it up. I liked the shape.

I sanded off some of the purple paint, then painted it with red craft paint, rubbing off the excess with a rag. A second coat of red, then a coat of gold craft paint on top and that was done.

Next, I took some lace, ricrac, and four buttons to finish decorating. I'm impatient, so it's all held on thanks to my trusty glue gun.

If the picture frame looks dusty, it's because Dad's now doind some serious downsizing and he gave it back. I love this cute picture of me and baby Rachel on her (and my hubby Frank's) first ever visit to Oregon. Rachel is 13 years old now. (See - that does explain the dust, doesn't it?)

...Huh. I still wear that coat...


Picture frame side detail, originally uploaded by passitonplates.
Picture frame side detail
Here's a close up of the ricrac that runs around the edge of the frame.


Back of the frame, originally uploaded by passitonplates.
On the back, I took a paint pen (ok well actually it was Tulip paint, for t-shirts) and wrote on the back of the picture frame.

Like I said earlier, never mind the dust.


Sunday, November 7, 2010

This morning I grabbed a cup of coffee and sat down at the computer to browse on The Find when I came across this Celebration Platter:

The description from Exposures says, Our Celebration Platter is the perfect gift for any occasion that's cause for celebration. New baby. Graduation. Job promotion. Commemorate the moment with this high-gloss white ceramic platter. It's large enough for all of your friends and loved ones to chime in with a special message. Just sign the plate with pen (one pen included; additional available for quicker signing), and bake in the oven for warm wishes that last a lifetime.

Their platter is on sale today for $46.99 and the pen is $11.99. Exposures charges $6.50 shipping for up to two pens. Yep, both of our plates use the same kind of food safe ceramic paint pen!

If you're like me - too thrifty and crafty to spend that much money on something that you could create yourself, you're probably thinking about how to make your own. And with all due respect to Exposures, our paint pens sell for less.

I sell them occasionally on Etsy for $10 each and shipping is free for up to 6 pens.

Here's how to make your own:

1. Get some of our pens in a couple of different colors. You could buy your own plate or platter at Target or another store for about $15-20. Just make sure it's ceramic or stoneware. Plastic will melt in the oven when you make the paint permanent.

2. Make sure your platter is clean - the paint pen is water based and surface oils on the plate will resist the paint. Make sure all your party guests have clean hands, too, so oily fingerprints don't cause the same problem.

3. Ask everyone at the party to use the pen to write something on the ceramic plate or platter.

4. When everyone has signed the platter, bake it in an oven for 30 minutes to make it permanent. (Instructions are written on the pen.) And it's dishwasher safe after you bake it, although I recommend hand washing all handmade items.

5. You could have everyone sign the platter at the beginning of the party and bake it during the party. If you're sneaky, you could get away with this without the guest of honor knowing what you're up to. The plate will be cooled and completely finished before the party's over and your gift will be the hit of the party and the guest of honor keeps your platter as a memento of the occasion.

This is a very personal, sentimental gift idea. Got a wedding or wedding shower, anniversary, or birthday coming up?

Wow, what a perfect gift!


PS: Pass It On Plates are a little different from the Celebration Platter shown at the top. Pass It On Plates have a tracking number on the back and they're intended to travel from person to person. You can get a pen with yours, if you want, so each person can write something on the plate as it travels - just to add to the fun.

Tuesday, July 6, 2010

Pass It On Plates has a new website!

If you are looking for our plate diaries at www.passitonplates.com, don't worry if you don't find them. Your plate diaries still exist and everything written in them is still there.

You can now find your plate diaries at our new website address: www.pass-it-on-plates.com

For more details on this change, please check out our Pass It On Plates blog post about the upgrade.
(If you want your plate to have the new website address written on the back, there is information about that as well in our Pass It On Plates blog.)

Thank you!

Sunday, March 28, 2010

Stamp Picture Frames

Stamps frame
I've always turned to crafts in the past when trying to figure something out - or when I was restless and needed some kind of change. You know when you have a restless creative moment and you feel compelled to just create to calm the inner crafty beast for a while?


Even when I'm trying to figure out a new Pretty Little Doo Dad to go with a new PlateWrap fabric, I turn to other craft projects to help me think.

Write a letter - frame


Lo and behold, I have a LOT of other completed crafty projects made when I couldn't figure something else out or when I just felt compelled to create. The dilemma now is I need to figure out what to do with all these creations and I don't dare craft away to figure it out. Not until I do something with all the other neat stuff filling my shelves and storage bins.


Aha! How about a little Etsy shop filled with all the nifty items I felt compelled to make? This is a totally random collection, but maybe that would do the trick. What do you think?


The pictures shown here are two picture frames I made from a decoupage of stamps, address book entries, air mail envelopes, and a pencil...


Are they Etsy-Worthy?


Monday, March 1, 2010

You ROCK


This is my most recent Pass It On Plate design.


I've got a stack of blank plates to paint up - got any ideas about what you'd like to see on a plate?

PS: This plate is part of our Plate Diary Dollars™ program.


Thursday, September 24, 2009

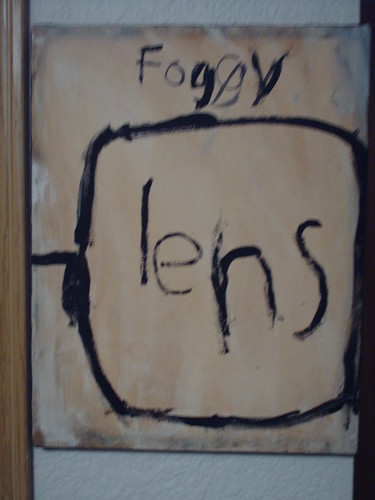
Foggy Lens


This is one of my favorite paintings. When she was in the 3rd grade, Rachel asked me to buy her a $2 canvas because she wanted to paint. She took it outside to the picnic table with a box of paint and brushes and went to work.

Within a short time, she had created this. She calls it a mess and doesn't like it, but there's just something about it that I love. It hangs on my bedroom wall so I can look at it every day.

Cost? We already had the paint, and the canvas was $2.

Oh, and I had the feed the starving artist when she was done.
A PB&J sandwich and a glass of milk set me back an additional 35 cents.


Thursday, September 10, 2009

Butterfly Tote Bag


Bright purple tote bag, originally uploaded by passitonplates.

I have a thing for tote bags.

As I sew up other projects, I find fabrics that go together and I often whip up a quick tote bag - the size is based on my immediate need.

A few months ago I needed one big enough to hold a couple three-ring binders and a few other misc things, so I took some leftover obnoxious butterfly fabric and some leftover obnoxious purple fabric and made this cute-and-not-really-obnoxious tote bag. The handles are grosgrain ribbon.


DSCN5118, originally uploaded by passitonplates.

My discerning (now) 13 year old decided I should put the butterflies on the inside and the solid color purple on the outside. She said it's for a visual surprise, but I really think she doesn't want to be embarrassed if I carry the bag while we're out together ... in public.

Ok, yeah, it's wrinkly in the picture. It had been stuffed in another tote bag for a while. I use it to haul notebooks and my calendar (and lunch) to the day job. It's also handy for packing shoes into a suitcase or carrying display stuff to a craft show. I can fit a small crock pot in here, too.

Despite the wrinkles, it's cute, eh?