Showing posts with label Tutorial. Show all posts

Monday, August 1, 2011

Laundry tip: How to clean grease spots off a shirt

I’m a messy eater. Most of my favorite shirts get dribbled with salad dressing, splattered with grease when frying eggs, or globbed down the front with whatever is served for dinner. I’m also cheap thrifty and buy shirts at the thrift store. Would you believe people get rid of perfectly good clothes just because they weren’t able to wash out a grease spot?

With all those grease spots on the fronts of all these shirts, I figured out a secret weapon that cleans them up like a pro, without costing me a fortune or killing the shirt with bleach:

Dish soap

You know the old slogan, “Dawn gets grease {whoosh} out of your way.” They’re not kidding. If dish soap is so good at degreasing pots and pans, I figured it would work on clothes. Besides, I’ve never seen grease spots on my dishcloths.

I love this secret weapon for grease spots because it’s inexpensive and I always have it on hand. Actually, I now have two bottles; one in the kitchen and the other in the laundry room.

Here are some pictures of two of my shirts dribbled with grease from a carnitas burrito (yummm, pork carnitas) and some chocolate oops from a sundae. No, I am not sticking to my diet, thank you very much for pointing that out.

The burrito grease and tomato sauce tank top:

DSCN9455

And the chocolate sundae oops on the t-shirt:

DSCN9460

Both shirts are 100% cotton, which seems to be the hardest to degrease in a regular laundry washing.

All the spots are generously dribbled with dish soap, then I roll up each shirt and let it sit overnight. I did notice that blue dish soap will leave a light blue stain on pure white shirts if left to sit more than 36 hours, but it will eventually wash out.

DSCN9456  DSCN9457DSCN9461  DSCN9462

Here’s the burrito tank top:

DSCN9463

And the chocolate sundae t-shirt. Perfect.

DSCN9465

If you have clothes in the back of your closet that have grease spots that you haven’t been able to wash out, give this a try. It has worked for me on shirts that have had old grease spots go through the dryer. It’s worth a try and you already have the secret weapon on hand in your kitchen.

If you buy clothes at thrift stores and garage sales, don’t be afraid of buying grease spotted shirts. This is such an easy fix to that little problem. 

Friday, July 1, 2011

Wicker Basket Planter

This summer we bought a few tomato plants with dreams of beautiful ripe home-grown tomatoes in the late summer. Since we are on a tight budget this summer, it has been impossible to find decent-looking large-ish pots or planters for $5 or less (it’s a very tight budget!) and as renters, I didn’t want to dig up the yard to put in a garden. DSCN9451

Then it occurred to me: all I really need is a container strong enough to hold the weight of wet soil and a little creativity. I decided to make Wicker Basket Planters. DSCN9441

The other day, I picked up a few sturdy wicker baskets at Goodwill. (Remember my quick trip to “William’s Boutique”) I bought a large basket for $2.99, and turned it into a planter in about 20 minutes. Here’s how:

Supplies

  • One wicker basket*
  • Glue gun (Low temp is best, but high temp will work)
  • Heavyweight Garbage bag – Make sure the circumference of the bag will accommodate the basket. If in doubt, measure or open the bag and try to pull it up over the sides of the basket.
  • Potting soil
  • A plant or two

1.  Fit a heavy duty garbage bag into the bottom of the basket, and fold the top down until the bag height is just a little taller than the sides of your basket. The fold should be to the outside of the bag so when the bag is in the basket, the folded plastic is between the bag and the basket. (In the picture, the grey thing is the handle tie of the bag.)

DSCN9440

2.  Using a glue gun, apply a blob of glue to one spot on the inside edge of the basket. For the rest of my instructions, I’ll refer to this point as North. My North point was under the handle.

Apply a blob of glue to the opposite side of the basket (South) and stick the opposite side of the bag to it. My South point was under the other side of the handle.

DSCN9442

3.  Now glue your way around from North to East, then South to East. Repeat going North to West and South to West. This way you don’t have a lot of extra bag bunched up at one spot in your basket, and when the soil goes in the weight won’t pull on the part of the bag that’s already pulled tight.
You should have a little extra bag at East and West. Fold it flat and glue it down.

DSCN9447

--------------------
The nice thing about using hot glue and a garbage bag is that the glue will still stick when it has cooled down a bit, so you have a little bit of working time between gluing and sticking.

I also have to admit a little faux pas at this point. I was sure my 13 gallon garbage bag was big enough, but it wasn’t. If this happens to you, just rip out the bag and start over. My heavy duty 30 gallon leaf bag was perfect.

DSCN9444  DSCN9445
--------------------

4.  Now that your bag is glued around the inside edge of the basket, spread it out across the bottom of the basket. Using a sharp blade, cut two small drain holes in the bottom of the bag underneath where each plant will sit.
DSCN9449

5.  Start filling your basket with potting soil. Using a mix with vermiculite will lighten the weight without compromising your plant. As your soil fills the basket, pull up a little on the sides of the bag to create some slack. You don’t want the weight of the soil to pull on the bag where it has been glued.
Add your plants and finish filling with soil. When the basket is almost full, tuck the excess bag down and hide it under the last 2-3” of soil.
DSCN9450

6.  Move the basket into place (you might have to lift it with two hands if the handle isn’t very sturdy), water thoroughly, and enjoy!DSCN9452


*Select a basket large enough to accommodate the roots of your plant. Generally you can expect the roots under the ground to be about the same size as the mature plant above ground. I figured my basket could hold two tomato plants.

Monday, June 20, 2011

William’s Boutique = Goodwill

I have a little bit of snob in me; I think I get it from my Grandma, who was the type to always changed into clean underwear and her best clothes for a simple trip to the store. She wore fine clothes and was proud of it.

Sorry Gram, but although I love clothes with a fine label like you did, my budget won’t let me buy them at Saks or Nordstrom. On the other hand you’ll be proud of how I managed to add $120 Nordstrom trousers, Macy’s labels and lots of Liz Claiborne to my wardrobe. I even have hundreds of dollars worth of Lane Bryant in my closet.

How? I shop at “William’s Boutique.” (That’s Goodwill to most people.)
Yes. I shop at Goodwill. But don’t tell anyone; I’m too snobby to admit it.

This past week I spent less than $23.00 on about 5 shirts that would have cost me about $140 if I bought them off the rack in their respective stores. Aside from a couple of duds I shouldn’t have gotten, nobody knows my clothes are second hand unless I tell them. (And the dud only set me back about $4-7, so it’s no big deal.)

Here’s how to do it:

First, there are some rules you need to know before you start.

  1. You will be speed shopping. Take a friend (recommended) but do not take young kids as they will slow you down.
  2. You are looking for the few hidden gems in the store. Expect to put a huge amount of merchandise in your cart before you head to the fitting room in order to find just a few items that you will actually buy.
  3. Be familiar with what looks good on you: colors, patterns, style. For example, I know I cannot wear horizontal stripes, lavender, or button up blouses. They just don’t work for me. On the other hand, I get compliments when I wear salmon, florals, and long-waisted pullovers. You also need to know your size based on how the garment looks on the hanger, not based on the tag. There is no standard measurement for sizing womens’ clothing, so a 14 from Target (Mossimo and Cherokee labels) is similar to a size 10 from JCPenny’s (Hunt Club, St John’s Bay) Other tags are wrong due to factory error, or just plain missing. Do not ever rely on the tags inside of the clothes.
  4. Don’t worry about salad dressing or other oily/food spots on the front of blouses. I will explain how to clean them. Ditto for loose/missing buttons if you don’t mind doing minor repairs. Many people would rather toss than fix these two problems, and I have noticed the more well-made (and upscale) the garment is, the more frequently I see these two very fixable issues.
  5. Goodwill’s return policy requires you to leave on the tags, return with receipt to the store where the item was purchased, and you get store credit only that expires in 30 days. That’s a hassle for me, so I treat every purchase as “all sales final.”
  6. Get the store discount card to save 5% off each purchase. It all adds up.
  7. If you really want to scoop up the deals, go to the expensive stores and try on their stuff. Learn the labels that fit your body well, then as you’re flipping through the clothes racks, you’ll recognize when you see an (almost) instant winner. This is how I ended up with so many my favorite labels. Even if it’s questionable on the rack I put it in my cart and usually end up buying it.

Ready to shop?

When you enter the store, grab a shopping cart. This is important. Next, decide what you’re looking for: pants, tops or dresses, and head over to the rack that has your size. Starting at one end, push all the hangers away from then end.

Look at every single piece on the rack, sliding the hanger down to the empty end of the rack, one by one. Don’t skip a single item. Go fast: no more than one second per item.

yuk shirt

Most items will be rejects. The items you are looking for are:

  • In a color/pattern you might consider wearing.
  • In your approximate size.
  • In reasonably good shape.
  • In a style that looks good on you

When I paw my way from one end of the clothes rack to another, the process is sort of like this: 
Flip flip flip (that’s me flipping through the hangers as fast as I can) flip flip flip flip
Oh hell no
flip flip flip flip flip
WTF??
flip flip flip flip flip flip
What were they thinking?
flip flip flip flip flip
Mmmm, maybe…

When you find something that does not repulse you, put it in your shopping cart.
I usually hang it from the handle of the cart. Ok, you’re laughing about me saying “When you find something that does not repulse you” but this is not ordinary shopping. You can’t expect to find awesome clothes calling to you from the rack. Trust me on this.

By the time you reach the end of the rack, you should have about a dozen items in your cart. At some store locations, I have put as many as 3 dozen items in my cart.

Go to the fitting rooms with your hoard of clothes. Goodwill limits people to 6 items, so take in 6 items with you to start. Just park your cart nearby; you’ll need it. Try on clothes as quickly as you can. I usually average about 45 seconds per item. (I am in and out of the store in about 30 minutes.)

Use your first impression to judge if it’s a keeper or reject. Remember, you’re still speed shopping. If you kind of like it, put it in the keeper pile. If you’re not sure, it’s a reject. Again, go as fast as you can. If it’s tight when you start putting it on, don’t waste time getting it all the way on.

If you brought a friend with you, let them help you judge the keepers from the rejects.

When you have gone through all 6 items in the dressing room, go get more from your cart and carry on. Goodwill probably doesn’t like how I make the switch, but in order to keep the same changing room, I leave on garment #6, stick the empty hanger on the doorknob so the door doesn’t lock behind me, then run out with the other 5 garments. The rejects go to their reject rack, the keepers go to my cart, as I load up 5 more garments and run back to my room. Then I repeat as necessary until I have tried on everything.

Here are the pictures I took in the dressing room during my recent trip to Goodwill:

   bleh   mmmebbee   keeper    
   not bad   NOooo   i like    
   winner winner    Phhhhhtt  
   yep    ugh  

DSCN9425
This last one is nice… oh wait. That’s what I wore to work today.

In the end, I started with 12 garments in my cart and bought 5. That’s a good haul. The floral shirt is linen and never worn from Avenue ($50 new), the teal one is Lane Bryant ($50 new), a slinky black polo-type shirt (about $20 new), plus a couple of cotton t-shirt tops (about $10-14 new.)

Oh, and I picked up 3 wicker baskets for a project I’ll tell you about later.
baskets

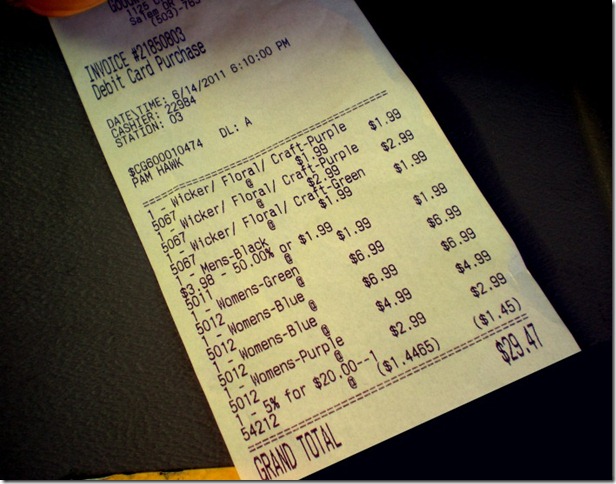
receipt

Grand total: $29.47 including about $7 for the baskets.
I used my Goodwill club card for 5% off, which means one of my $1.99 purchases really only cost me $.59!

Last thing - I know the stores are clean and all, but whenever I’m done shopping at William’s Boutique, I always need to do a little post-shopping ritual in my car before I leave the parking lot.

wet ones

PS: I have had several compliments already on my $6.99 teal top. Score!

Next week I will tell you my secret for removing salad dressing and other oily spots from shirts.

Tuesday, February 1, 2011

Sweet Valentine's Picture Frame

Sweet Valentine's Picture Frame
I made this picture frame as a gift for my Dad one year for Valentines' Day. The frame was a purple wooden frame on clearance for $.50 at Target and I couldn't pass it up. I liked the shape.

I sanded off some of the purple paint, then painted it with red craft paint, rubbing off the excess with a rag. A second coat of red, then a coat of gold craft paint on top and that was done.

Next, I took some lace, ricrac, and four buttons to finish decorating. I'm impatient, so it's all held on thanks to my trusty glue gun.

If the picture frame looks dusty, it's because Dad's now doind some serious downsizing and he gave it back. I love this cute picture of me and baby Rachel on her (and my hubby Frank's) first ever visit to Oregon. Rachel is 13 years old now. (See - that does explain the dust, doesn't it?)

...Huh. I still wear that coat...


Picture frame side detail, originally uploaded by passitonplates.
Picture frame side detail
Here's a close up of the ricrac that runs around the edge of the frame.


Back of the frame, originally uploaded by passitonplates.
On the back, I took a paint pen (ok well actually it was Tulip paint, for t-shirts) and wrote on the back of the picture frame.

Like I said earlier, never mind the dust.


Saturday, November 27, 2010

Pyramid Pillows Tutorial

Blue Flame Pillow, originally uploaded by passitonplates.

I made a pair of pyramid pillows for Rachel a couple years ago. (This is one of the pair.)
It was so easy to do.

Materials:
One piece of fabric, twice as long as it is wide
Polyfoam pillow stuffing
Coordinating thread

Instructions:
1. Fold the fabric in half, right sides together , and matching the short ends. (It should look like a square.)
2. Sew along the short ends to make a tube.
3. Sew along one of the other open ends so the square is open on only one of the four sides.
4. Lay out the square with the open side at the top, the folded side on your right, and the side seam on your left.
5. Measure along the raw edge of the open side and mark the center point.
6. Flip the square over and repeat step 5.
7. Pinch one of your marks between the fingers on your right hand, pinch the other mark between the fingers on your left hand, and pull taut. The side seam should now be at the center point on the open end. Pin.
8. Sew along this edge to close, leaving about 6" open.
9. Turn right side out, stuff to desired softness, tuck in the raw edges, and topstitch to close.

Monday, February 1, 2010

How clean is your coffee?

Have you ever thought about the gunk that gets stuck under the gasket in your coffee lid?
Did you even know your gasket is not permanently attached to your coffee lid? It's just snapped on like a big silicone rubber band.

Since it's not glued on, whatever is in the cup can seep under the gasket. Even if your cup is not leaky, your gasket probably has a nice build up of black gunk underneath it.

And since the contents of your cup can seep under the gasket, whatever is under the gasket will mix with the beverage in your cup...
...and you are drinking it.
Is there gunk in your groove?

You should be able to pry the gasket out of the groove with your fingernail or the tip of a spoon.

After you peel out the gasket you may be surprised or shocked or just plain grossed out to see what kind of gunk is in the groove of your coffee lid. Scrub your gasket and scrub the groove.

You can even soak it in bleach water if it makes you feel better.


When it's dry, just pop it back on like a rubber band. Just make sure the gasket doesn't twist or you'll end up with a dribble glass. Not so fun if you're drinking coffee in the car on your way to work.

(Kind of fun if you loan the cup to someone else to drink out of... Use your best judgement, though, and don't blame me if they get a little testy about coffee drips down the front of their shirt.)
Clean your other mugs

Got other car coffee mugs? If one's dirty, they're all dirty. Pull the gasket off all your mug lids and give the gasket and channel a good scrub.

Brace yourself. It's gonna be gross.
And you were drinking out of these mugs! Eeeeew.


Friday, June 19, 2009

Chicken Packages

We have been low-carbing at home, with some nice success. It's always hard trying to figure out what the heck to eat, though. The same-old same-old gets boring fast.


I'm going to copy an idea I used last Xmas when I made up some seasoned chix breasts as a gift for my dad. We vacuum sealed 6 breasts with 3 different seasoning blends. I figured it would be an easy way for him to cook a meal or two worth of meat at a time, with sodium-controlled seasoning. He really liked the gift.


Six Vac-sealed Seasoned Chix Breasts, originally uploaded by passitonplates.

I figured I'd like to show you what I'll be doing in case you want to try it too.

First, you need a vacuum sealer for food. We call this appliance a "Food Sucker." A Vac Sealer (or Food Sucker) sucks all the air out of food packages as they're sealed to prevent the food from getting freezer burn. We like to buy meat in bulk then separate the package into vac seal bags and freeze the meat in smaller portions.

My brother in law likes to vac seal marshmallows, fresh tomatoes, and raw potatoes. We don't recommend vac sealing soft or raw food. He will probably die of embarrassment if he reads this. While you can imagine what happened with the marshmallows and tomatoes, I won't tell you what happened with the potatoes.

...it smelled really bad...

Ok, so here are the basics for seasoning and sealing 3 different varieties of chicken breasts.

  1. Set aside a plate or pie dish per seasoning blend (listed below)
  2. Mix each set of seasoning blend ingredients into its own plate. The herbs and spices are listed below but you can decide how much seasoning you want to use. I like my seasoning on the heavy side, so I would mix up about 1 Tbs of seasoning per chicken side = 4 Tbs for 2 chicken breasts.
  3. Dip each side of the raw chicken breast in your prepared seasoning blend.
  4. Place the breast a vac seal bag, then seal it.
  5. Freeze in a single layer in the freezer and use within 6 months.

Seasoning blends:


Garlic Ginger Chix, originally uploaded by passitonplates.

This is Garlic Ginger chicken.

Mix the following seasonings to taste:

  • granulated onion
  • smoked paprika
  • black pepper
  • granulated garlic
  • fresh garlic, either to taste or to make it look pretty, like I did
  • ginger
  • cumin


Chicken Provencal, originally uploaded by passitonplates.

This is the Chix Provencal,
  • oregano
  • thyme
  • rosemary
  • tarragon
  • parsely
  • lavender
  • cracked black peppercorns
This includes a slice of dried black truffle. (The orange arrow points to the truffle on one of the breasts.) I have a good friend who is a professional mycologist (mushroom hunter.) Every now and then we're lucky enough to get a few of the highly sought-after black truffles and Oregon white truffles. Just a sliver transforms a dish, and the little slice of black truffle on these chicken breasts will turn them into an amazing meal. If you want to try some truffles, visit his website at www.trufflezone.com Be sure to tell them Pam and Frank say Hi!


Enchilada Chicken, originally uploaded by passitonplates.

This one is Enchilada Chicken - everything I throw in the pan when I make Chix Enchiladas:

  • oregano, crushed dried and ground
  • granulated onion
  • granulated garlic
  • chili powder
  • freshly cracked black pepper
  • red pepper flakes
  • lots of cumin
  • after the chicken is in the bag but before sealing, add about a tsp of lime juice
  • and dress up each breast with a bay leaf

When it's time to cook them, thaw the chicken, slide them out of the bag into a hot pan or baking dish, and cook until they have an internal temperature of 160F or until juices run clear.

Yummmmmm...


Friday, June 12, 2009

Spiffied up CD jewel case liners


Here is a nifty CD case insert
Originally uploaded by passitonplates

Boring and Bland are my enemies. Their evil plan is to make life as boring as possible, and we just can't have that now, can we?

Whenever possible I try to foil their evil plan... with as little time and effort as necessary.

Maybe I'm cheap and lazy. No, don't try to be nice. I admit it. I am cheap and lazy.

I take great pride in my easy craft projectss and love making all kinds of fabulous stuff for cheap. (wink!)


And it's fun on the inside, too
Originally uploaded by passitonplates

See?
Fun fun fun on both sides of the insert.

Yeah, I'm thinking those "design your own CD case insert" programs are awful and my printer is not that great. This is faster, easier, better-looking, and I can do it when it's someone else's turn on the home computer.

See? Tell your mother it's not a such bad thing to be lazy. And when you admit to her that you're cheap, be sure to point out you mean financially. Not . . . the other kind of cheap.


The paper has designs on both sides
Originally uploaded by passitonplates

This was so easy and looked so great that I made a bunch and then scoured the house looking for more vacant CD cases to spiffy up.

Ok, ready? Here's how to make yours:

1. Select a sheet of two-sided scrap booking paper that you want to use for this project. Decide which side will be shown when the case is closed and which side will be shown when the case is open.

2. Fold the sheet of paper, making sure that the paper on at least one side of the fold is as large (or larger than) the CD jewel case.

3. Align an existing CD insert with the folded edge of your scrap booking paper. Using the CD insert as your template, and a really light touch with your pencil, trace around the remaining 3 sides of the CD insert.

4. Cut along your traced line.

5. Embellish as desired. I traced the shape of the CD on the front and cut it out.

6. Slide into place.

Ta dah!
Now poke through the house looking for more boring CD jewel cases to spiffy up.
You know you want to.