Showing posts with label Frugal Nesting. Show all posts

Sunday, October 30, 2011

Rx Organization

You probably know that it’s easier to be frugal if you’re organized. It saves you time and you never have to buy duplicates (unless it’s a really really good deal!)

Here’s another frugal organization tip – it’s easy for the whole family to keep organized and easy for the CEO (that’s the mom in most cases) to know when it’s time to go shopping.
DSCN8747
We have an old dresser that we keep frequently used items in. In past homes, the drawers have been used to store office supplies, prescription medication, baking supplies, craft supplies, sewing notions, frequently used tools, and grilling supplies/tongs/skewers. In our current home, one drawer is for prescription medications. Due to Frank’s interesting year, our family has a large variety of these at the moment. Right now the dresser is in the kitchen, and houses the coffee station on top. (And apparently some vitamins that don’t fit in the medication drawer…)

Here is our medicine drawer. Yes, it’s full. And so anal retentively organized that any one of us can find exactly what we’re looking for in an instant.
DSCN8748
First, look at the lids of each bottle. When we get a new bottle home from the pharmacy, we write the first few letters of the medicine on the lid. There is always a black Sharpie in the drawer to make this a quick task. One bottle is even marked with a specific time, since that’s an important detail for that med.

Do you see the little boxes in the drawer? Frank has his current pills in one box, medicines that are currently on hold in another box, ones that need to be cut in a third box (with the pill cutter,) vitamins in a box, and my pills in my own box.
DSCN8749
The boxes are the ends of empty cereal boxes. I just cut them down with a paring knife and scissors, then covered them in turquoise duct tape. I could have just left them the way they were, but they look nicer and more streamlined with the tape. Maybe I’m a dork; I’m just happier when it’s pretty. These two boxes are Frank’s, and they’re taped together. He knows which pills are on each side of the box divider.

Yes, there is a bottle with "Oxy Wow" written on the lid. I'm sure you can figure out which painkiller that one is. That's what we call it - because you take one and Wow.

You may be lucky to not have so many medications to manage, but this could come in handy if you take vitamins and supplements, if you have a lot of spices, or you need to organize your packets of taco seasoning and Lipton onion soup.

In our case, with all the medicines, each bottle has a home, and they’re all put away after the daily dose. When one bottle is getting close to needing a refill, the bottle is left out on the dresser. That’s the only time it’s not put away. When I see one sitting out, I call it in to the pharmacy. The bottle stays out until we pick up its replacement. Then the new lid is marked with the name and it’s put away. That’s just our easy way of managing all the meds without having to talk about it and risk missing a dose due to poor communication or a missing pill bottle.

Oh – with all the pill bottles we’re tossing into the recycling bin, I asked our pharmacist what we should do to protect ourselves against id theft. She said to peel off just the part of the label with our name and the prescription #. If the med is a narcotic or something with a street value, peel the medicine name off as well. Those parts of the label go in the trash and the bottle goes to recycling. 

Do you have a super-abundance of pills or spices or something else that you have all magnificently organized? Do tell.

Friday, August 5, 2011

Our summer garden

I love our backyard. It’s small and plain, but there are some elements here that make me so happy that I love to just sit outside and enjoy the space. When it’s nice out, the back deck is my happy place. Here’s what’s growing and blooming right now:

Cherry TomatoesDSCN9520

Thai peppers  DSCN9515

Lemon balm (it’s growing wild in patches here and there all around the property),
an artichoke, and a tomato plant that is as tall as I am.

DSCN9517

Frank is checking out the progress of his red peppers. He says this is the kind used in making chimichurri, a kind of hot sauce/relish. That’s his plan for these peppers. I’m too much of a Scandinavian wimp, though, (Scandinavian hot sauce is butter with a pinch of black pepper) and don’t think I have the guts to try it.

DSCN9516

Yes, Frank has long hair. He was growing it to see how long it could grow until chemo made it fall out. The plan sort of backfired though, when he didn’t lose a single hair from the chemo. Now it’s almost like a trophy, and so he continues to let it grow. I don’t care. Could be worse, like him wanting a sports car or a mistress.

Back to the yard…

My all time July favorite is this big vine-y shrub on the left: Jasmine.

Oh, I wish computers had smell-o-vision so you could breathe in the heady perfume of these little white flowers. The fragrance wafts into my open kitchen window and fills up the back of the house.DSCN9519

DSCN9518

A little stroll down the alley behind my next door neighbor’s house brings another treat:
Gladiolus and blackberries and more wild lemon balm.
(This neighbor is the crafty lady with the colored pencil fence.)

DSCN9496

I asked her what variety she planted and she said, “I don’t know, black ones?”

DSCN9495  DSCN9494

Did you know there are over 1100 varieties of blackberries. We have lots of commercial caneberry (blackberry and raspberry) farms here in the Willamette Valley. Marionberries were developed here in Marion County and are full bodied and sweet, like a cross between raspberries and blackberries. My favorite blackberries for eating out of hand are the hardest to find in the markets: Black Cap. They’re so mellow and sweet and will turn your mouth dark purple in an instant. They’re hard to find for raw consumption because they’re processed into food grade dye and sold to the meat packing industry to be used for marking sides of beef with grades such as “USDA Prime” and the like.

But I digress. With all those tomato plants I can’t wait until late August when we can start picking and eating and drying and canning all the tomatoes. Mmm.

Monday, August 1, 2011

Laundry tip: How to clean grease spots off a shirt

I’m a messy eater. Most of my favorite shirts get dribbled with salad dressing, splattered with grease when frying eggs, or globbed down the front with whatever is served for dinner. I’m also cheap thrifty and buy shirts at the thrift store. Would you believe people get rid of perfectly good clothes just because they weren’t able to wash out a grease spot?

With all those grease spots on the fronts of all these shirts, I figured out a secret weapon that cleans them up like a pro, without costing me a fortune or killing the shirt with bleach:

Dish soap

You know the old slogan, “Dawn gets grease {whoosh} out of your way.” They’re not kidding. If dish soap is so good at degreasing pots and pans, I figured it would work on clothes. Besides, I’ve never seen grease spots on my dishcloths.

I love this secret weapon for grease spots because it’s inexpensive and I always have it on hand. Actually, I now have two bottles; one in the kitchen and the other in the laundry room.

Here are some pictures of two of my shirts dribbled with grease from a carnitas burrito (yummm, pork carnitas) and some chocolate oops from a sundae. No, I am not sticking to my diet, thank you very much for pointing that out.

The burrito grease and tomato sauce tank top:

DSCN9455

And the chocolate sundae oops on the t-shirt:

DSCN9460

Both shirts are 100% cotton, which seems to be the hardest to degrease in a regular laundry washing.

All the spots are generously dribbled with dish soap, then I roll up each shirt and let it sit overnight. I did notice that blue dish soap will leave a light blue stain on pure white shirts if left to sit more than 36 hours, but it will eventually wash out.

DSCN9456  DSCN9457DSCN9461  DSCN9462

Here’s the burrito tank top:

DSCN9463

And the chocolate sundae t-shirt. Perfect.

DSCN9465

If you have clothes in the back of your closet that have grease spots that you haven’t been able to wash out, give this a try. It has worked for me on shirts that have had old grease spots go through the dryer. It’s worth a try and you already have the secret weapon on hand in your kitchen.

If you buy clothes at thrift stores and garage sales, don’t be afraid of buying grease spotted shirts. This is such an easy fix to that little problem. 

Friday, July 1, 2011

Wicker Basket Planter

This summer we bought a few tomato plants with dreams of beautiful ripe home-grown tomatoes in the late summer. Since we are on a tight budget this summer, it has been impossible to find decent-looking large-ish pots or planters for $5 or less (it’s a very tight budget!) and as renters, I didn’t want to dig up the yard to put in a garden. DSCN9451

Then it occurred to me: all I really need is a container strong enough to hold the weight of wet soil and a little creativity. I decided to make Wicker Basket Planters. DSCN9441

The other day, I picked up a few sturdy wicker baskets at Goodwill. (Remember my quick trip to “William’s Boutique”) I bought a large basket for $2.99, and turned it into a planter in about 20 minutes. Here’s how:

Supplies

  • One wicker basket*
  • Glue gun (Low temp is best, but high temp will work)
  • Heavyweight Garbage bag – Make sure the circumference of the bag will accommodate the basket. If in doubt, measure or open the bag and try to pull it up over the sides of the basket.
  • Potting soil
  • A plant or two

1.  Fit a heavy duty garbage bag into the bottom of the basket, and fold the top down until the bag height is just a little taller than the sides of your basket. The fold should be to the outside of the bag so when the bag is in the basket, the folded plastic is between the bag and the basket. (In the picture, the grey thing is the handle tie of the bag.)

DSCN9440

2.  Using a glue gun, apply a blob of glue to one spot on the inside edge of the basket. For the rest of my instructions, I’ll refer to this point as North. My North point was under the handle.

Apply a blob of glue to the opposite side of the basket (South) and stick the opposite side of the bag to it. My South point was under the other side of the handle.

DSCN9442

3.  Now glue your way around from North to East, then South to East. Repeat going North to West and South to West. This way you don’t have a lot of extra bag bunched up at one spot in your basket, and when the soil goes in the weight won’t pull on the part of the bag that’s already pulled tight.
You should have a little extra bag at East and West. Fold it flat and glue it down.

DSCN9447

--------------------
The nice thing about using hot glue and a garbage bag is that the glue will still stick when it has cooled down a bit, so you have a little bit of working time between gluing and sticking.

I also have to admit a little faux pas at this point. I was sure my 13 gallon garbage bag was big enough, but it wasn’t. If this happens to you, just rip out the bag and start over. My heavy duty 30 gallon leaf bag was perfect.

DSCN9444  DSCN9445
--------------------

4.  Now that your bag is glued around the inside edge of the basket, spread it out across the bottom of the basket. Using a sharp blade, cut two small drain holes in the bottom of the bag underneath where each plant will sit.
DSCN9449

5.  Start filling your basket with potting soil. Using a mix with vermiculite will lighten the weight without compromising your plant. As your soil fills the basket, pull up a little on the sides of the bag to create some slack. You don’t want the weight of the soil to pull on the bag where it has been glued.
Add your plants and finish filling with soil. When the basket is almost full, tuck the excess bag down and hide it under the last 2-3” of soil.
DSCN9450

6.  Move the basket into place (you might have to lift it with two hands if the handle isn’t very sturdy), water thoroughly, and enjoy!DSCN9452


*Select a basket large enough to accommodate the roots of your plant. Generally you can expect the roots under the ground to be about the same size as the mature plant above ground. I figured my basket could hold two tomato plants.

Monday, June 20, 2011

William’s Boutique = Goodwill

I have a little bit of snob in me; I think I get it from my Grandma, who was the type to always changed into clean underwear and her best clothes for a simple trip to the store. She wore fine clothes and was proud of it.

Sorry Gram, but although I love clothes with a fine label like you did, my budget won’t let me buy them at Saks or Nordstrom. On the other hand you’ll be proud of how I managed to add $120 Nordstrom trousers, Macy’s labels and lots of Liz Claiborne to my wardrobe. I even have hundreds of dollars worth of Lane Bryant in my closet.

How? I shop at “William’s Boutique.” (That’s Goodwill to most people.)
Yes. I shop at Goodwill. But don’t tell anyone; I’m too snobby to admit it.

This past week I spent less than $23.00 on about 5 shirts that would have cost me about $140 if I bought them off the rack in their respective stores. Aside from a couple of duds I shouldn’t have gotten, nobody knows my clothes are second hand unless I tell them. (And the dud only set me back about $4-7, so it’s no big deal.)

Here’s how to do it:

First, there are some rules you need to know before you start.

  1. You will be speed shopping. Take a friend (recommended) but do not take young kids as they will slow you down.
  2. You are looking for the few hidden gems in the store. Expect to put a huge amount of merchandise in your cart before you head to the fitting room in order to find just a few items that you will actually buy.
  3. Be familiar with what looks good on you: colors, patterns, style. For example, I know I cannot wear horizontal stripes, lavender, or button up blouses. They just don’t work for me. On the other hand, I get compliments when I wear salmon, florals, and long-waisted pullovers. You also need to know your size based on how the garment looks on the hanger, not based on the tag. There is no standard measurement for sizing womens’ clothing, so a 14 from Target (Mossimo and Cherokee labels) is similar to a size 10 from JCPenny’s (Hunt Club, St John’s Bay) Other tags are wrong due to factory error, or just plain missing. Do not ever rely on the tags inside of the clothes.
  4. Don’t worry about salad dressing or other oily/food spots on the front of blouses. I will explain how to clean them. Ditto for loose/missing buttons if you don’t mind doing minor repairs. Many people would rather toss than fix these two problems, and I have noticed the more well-made (and upscale) the garment is, the more frequently I see these two very fixable issues.
  5. Goodwill’s return policy requires you to leave on the tags, return with receipt to the store where the item was purchased, and you get store credit only that expires in 30 days. That’s a hassle for me, so I treat every purchase as “all sales final.”
  6. Get the store discount card to save 5% off each purchase. It all adds up.
  7. If you really want to scoop up the deals, go to the expensive stores and try on their stuff. Learn the labels that fit your body well, then as you’re flipping through the clothes racks, you’ll recognize when you see an (almost) instant winner. This is how I ended up with so many my favorite labels. Even if it’s questionable on the rack I put it in my cart and usually end up buying it.

Ready to shop?

When you enter the store, grab a shopping cart. This is important. Next, decide what you’re looking for: pants, tops or dresses, and head over to the rack that has your size. Starting at one end, push all the hangers away from then end.

Look at every single piece on the rack, sliding the hanger down to the empty end of the rack, one by one. Don’t skip a single item. Go fast: no more than one second per item.

yuk shirt

Most items will be rejects. The items you are looking for are:

  • In a color/pattern you might consider wearing.
  • In your approximate size.
  • In reasonably good shape.
  • In a style that looks good on you

When I paw my way from one end of the clothes rack to another, the process is sort of like this: 
Flip flip flip (that’s me flipping through the hangers as fast as I can) flip flip flip flip
Oh hell no
flip flip flip flip flip
WTF??
flip flip flip flip flip flip
What were they thinking?
flip flip flip flip flip
Mmmm, maybe…

When you find something that does not repulse you, put it in your shopping cart.
I usually hang it from the handle of the cart. Ok, you’re laughing about me saying “When you find something that does not repulse you” but this is not ordinary shopping. You can’t expect to find awesome clothes calling to you from the rack. Trust me on this.

By the time you reach the end of the rack, you should have about a dozen items in your cart. At some store locations, I have put as many as 3 dozen items in my cart.

Go to the fitting rooms with your hoard of clothes. Goodwill limits people to 6 items, so take in 6 items with you to start. Just park your cart nearby; you’ll need it. Try on clothes as quickly as you can. I usually average about 45 seconds per item. (I am in and out of the store in about 30 minutes.)

Use your first impression to judge if it’s a keeper or reject. Remember, you’re still speed shopping. If you kind of like it, put it in the keeper pile. If you’re not sure, it’s a reject. Again, go as fast as you can. If it’s tight when you start putting it on, don’t waste time getting it all the way on.

If you brought a friend with you, let them help you judge the keepers from the rejects.

When you have gone through all 6 items in the dressing room, go get more from your cart and carry on. Goodwill probably doesn’t like how I make the switch, but in order to keep the same changing room, I leave on garment #6, stick the empty hanger on the doorknob so the door doesn’t lock behind me, then run out with the other 5 garments. The rejects go to their reject rack, the keepers go to my cart, as I load up 5 more garments and run back to my room. Then I repeat as necessary until I have tried on everything.

Here are the pictures I took in the dressing room during my recent trip to Goodwill:

   bleh   mmmebbee   keeper    
   not bad   NOooo   i like    
   winner winner    Phhhhhtt  
   yep    ugh  

DSCN9425
This last one is nice… oh wait. That’s what I wore to work today.

In the end, I started with 12 garments in my cart and bought 5. That’s a good haul. The floral shirt is linen and never worn from Avenue ($50 new), the teal one is Lane Bryant ($50 new), a slinky black polo-type shirt (about $20 new), plus a couple of cotton t-shirt tops (about $10-14 new.)

Oh, and I picked up 3 wicker baskets for a project I’ll tell you about later.
baskets

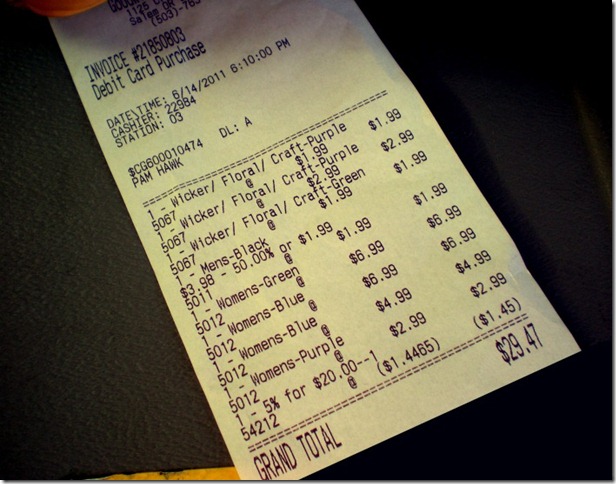
receipt

Grand total: $29.47 including about $7 for the baskets.
I used my Goodwill club card for 5% off, which means one of my $1.99 purchases really only cost me $.59!

Last thing - I know the stores are clean and all, but whenever I’m done shopping at William’s Boutique, I always need to do a little post-shopping ritual in my car before I leave the parking lot.

wet ones

PS: I have had several compliments already on my $6.99 teal top. Score!

Next week I will tell you my secret for removing salad dressing and other oily spots from shirts.

Thursday, December 16, 2010

Christmas is tight this year

My dear friends and family,

Somewhat embarrassing to admit, I'm not getting an annual bonus and Christmas is tight this year. I will be making bedroom slippers for you all as gifts. Please let me know your sizes. You'll most likely agree that it's a splendid idea, and should you wish to do the same, I've included the instructions below.

How to make bedroom slippers out of maxi pads:

You need four maxi pads to make a pair.
Two of them get laid out flat, for the foot part.
The other two wrap around the toe area to form the top.
Tape or glue each side of the top pieces to the bottom of the foot part.

Decorate the tops with whatever you desire, silk flowers (this is most aesthetically appealing), etc.

These slippers are:
* Soft and Hygienic
* Non-slip grip strips on the soles
* Built in deodorant feature keeps feet smelling fresh
* No more bending over to mop up spills
* Disposable and biodegradable
* Environmentally safe
* Three convenient sizes: Regular, Light and Get out the Sand Bags.

I've attached a photo of the first pair I made so that you can see the nifty slippers for yourself....

Maxi Pad Slippers

Monday, December 6, 2010

Funky “trash” as wall art

DSCN8752
Our dining room has lots of wall space for pictures, but our budget doesn’t have lots of cash for pictures. Do you also have some wall space that’s just crying out for art?

Here’s a conversation-starting idea: made funky wall art with empty wine bottles. They’re basically trash recycling. How’s that for thrifty nesting?

I’m one of those weirdoes who shops based on packaging or scent. In this case, I picked bottles of wine that had the coolest, most fun labels in the store. Chug-chug and it’s done… no, we didn’t chug the wine. It was actually very good and I’d like to buy more of this label. Anyway, I picked some wine labels that appeal to me as little pieces of art. Since my taste in art is a little modern, tongue-in-cheek, and food related, these labels AND bottles were perfect for my décor. Next time you’re in your grocery store or wine shop, take a look at the labels. I bet you’ll find a few that appeal to your taste in art.

By the way, if you’re more interested in a beautiful wine label and don’t want the bottle, redwinebuzz.com has a great tutorial on how to remove wine bottle labels.

Back to this thrifty nesting project:
  • Each bottle of wine was $7. If you have friends who drink wine with cool labels, ask them for their bottles. Heck – visit a restaurant that is proud of their wine list and ask if you can pick through their empty bottles. I am not kidding. It’s trash. Just tell them why you want the bottles.
  • The shelf is a $2 Goodwill find. I gave it two coats of green craft paint and two coats of gloss Mod Podge for some shine.
  • Hang the shelf and arrange your bottles on it. I suggest it would look best with 3 and 5 bottles. No more, no less.
Total project cost, including the wine that we drank with dinner: $30. If you get your bottles for free, then total cost $2.

In this case, I feel that I hung it just a little bit too high on the wall. I need to lower it about 6 inches. The rule of thumb when hanging pictures or art is to place the center of the picture at eye level. Figure out where the nail would go, then lower the nail another 1 to 3 inches. Trust me. Most people hang pictures too high. When you hang it just below eye level, it makes the space and art more intimate and sophisticated. And it gives your art the impression that it cost more than you spent. It’s all psychology, but I urge you to try it and see how lower pictures makes you feel. 

If you try this, please take a picture and share it with me – I’d love to see how it turned out!

Wednesday, December 1, 2010

We have a fifteen year old at home who eventually will move out and set up her own Christmas tree in her own home. My own tree has several ornaments I got on trips or as gifts from dear friends, and they're all part of my own heirloom Christmas tree ornaments. Even the plastic Santa selling ice cream cones that I got on a road trip to Florida is one of my heirlooms, not because of the quality, but because of the memories surrounding it.

When my kiddo was a teeny baby, I knew she would need some of her own ornaments when she set up her very first Christmas tree (she can't have my plastic ice cream selling Santa, it's MINE), and so we started a cherished family tradition that she loves.

Here's a fun Frugal Nesting tip you can use to start a family tradition with any little ones in your family: start a collection of future Christmas or holiday heirlooms for your children to have when they set up their own homes.


On our daughter's first Christmas, she was a 2 month old preemie, only about 4 pounds, and still dwarfed by her preemie jammies. One of this tiny baby's gifts was an ornament that showed a teeny tiny baby teddy bear and the words "Baby's First Christmas."

Every year since, Santa has given her one or more ornaments that represent something significant from that year. By the time she sets up her first Christmas tree in her own place, she'll have a collection of heirloom ornaments to place on the tree. Each one will have a story that she can eventually tell to her kids and grandkids.

Christmas Ornaments 3, originally uploaded by Randy Son Of Robert.

The pictures in this post are borrowed from flickr users, but Rachel's ornaments include:

A pelican - from when her dad lived and worked 90 miles from home (boy did we miss him!) right on the beach at a restaurant called The Pelican Pub. We loved visiting him and climbing the big 300 foot tall sand dune just yards from the pub.

A sewing machine - when she was in third grade, her class sewed aprons as a class project. She was especially proud of hers and I still wear it when making cookies.

A truck - a few summers ago she visited G-ma and G-pa on the farm in Wisconsin. She was only 10 but that summer she learned how to drive the old farm truck. (In the field.) Later, when she returned home, she offered to drive my car for me, since she already knew how to drive. Thank goodness logic prevailed and she understood "no license-no driving."

When she started playing the cello in orchestra my sister Tina came to the rescue with a cello ornament. G-ma Donna also sent a music stand ornament the same year.

The past few years things have changed a little with Christmas. She approaches me and asks, "Are you giving me another ornament this year?"

I told her, "Yes, of course Santa will give you another one."

She raised one eyebrow. (I wish I could do that!) "Yeah, whatever."

Before she could stick her ipod headphones back into her ears I quickly asked, "Do you want to pick one out or be surprised?"

She smiled. "I want to be surprised. I love the ornaments."

Sunday, November 7, 2010

This morning I grabbed a cup of coffee and sat down at the computer to browse on The Find when I came across this Celebration Platter:

The description from Exposures says, Our Celebration Platter is the perfect gift for any occasion that's cause for celebration. New baby. Graduation. Job promotion. Commemorate the moment with this high-gloss white ceramic platter. It's large enough for all of your friends and loved ones to chime in with a special message. Just sign the plate with pen (one pen included; additional available for quicker signing), and bake in the oven for warm wishes that last a lifetime.

Their platter is on sale today for $46.99 and the pen is $11.99. Exposures charges $6.50 shipping for up to two pens. Yep, both of our plates use the same kind of food safe ceramic paint pen!

If you're like me - too thrifty and crafty to spend that much money on something that you could create yourself, you're probably thinking about how to make your own. And with all due respect to Exposures, our paint pens sell for less.

I sell them occasionally on Etsy for $10 each and shipping is free for up to 6 pens.

Here's how to make your own:

1. Get some of our pens in a couple of different colors. You could buy your own plate or platter at Target or another store for about $15-20. Just make sure it's ceramic or stoneware. Plastic will melt in the oven when you make the paint permanent.

2. Make sure your platter is clean - the paint pen is water based and surface oils on the plate will resist the paint. Make sure all your party guests have clean hands, too, so oily fingerprints don't cause the same problem.

3. Ask everyone at the party to use the pen to write something on the ceramic plate or platter.

4. When everyone has signed the platter, bake it in an oven for 30 minutes to make it permanent. (Instructions are written on the pen.) And it's dishwasher safe after you bake it, although I recommend hand washing all handmade items.

5. You could have everyone sign the platter at the beginning of the party and bake it during the party. If you're sneaky, you could get away with this without the guest of honor knowing what you're up to. The plate will be cooled and completely finished before the party's over and your gift will be the hit of the party and the guest of honor keeps your platter as a memento of the occasion.

This is a very personal, sentimental gift idea. Got a wedding or wedding shower, anniversary, or birthday coming up?

Wow, what a perfect gift!


PS: Pass It On Plates are a little different from the Celebration Platter shown at the top. Pass It On Plates have a tracking number on the back and they're intended to travel from person to person. You can get a pen with yours, if you want, so each person can write something on the plate as it travels - just to add to the fun.