Friday, June 26, 2009
... From my sister in law ...
Thursday, June 25, 2009
About Pam... part II
I lived in Moquah when the tavern burned down in the 80's. Of course, the owner still had his liquor permit, so he rebuilt with whatever scraps he could find.
It wasn't insulated, so you had to keep your coat on in the winter, but in the summer it featured 100% natural air conditioning. Or at least 100% natural air. There was no glass or plastic over the windows.
At some point, he bought some red vinyl booths and they sat outside under a tarp for a couple of years before he installed them. I think leaning them outside was a good idea, because by the time he finally got around to installing them, they were as weathered as the building, and they matched the rest of the decor.
The Plywood Palace is one of two bars in teen tiny unincorporated Moquah. The other bar is called Nep's, and I remember going in there as a kid. John (my step dad) would walk behind the bar and get us two glass bottles of pop from the fridge and two candy bars, then we'd sit at the bar, enjoy our treats, and hang out. But that's another story.
Thank you to Moeview is Aaron Molina for permission to use this photo. Aaron, I love your work. Dear readers, please check out Aaron's photos. Especially this one. Wow.
Tuesday, June 23, 2009
About Pam... part I
At the time, we had a Catholic Church (big surprise) a cheese factory (again, big surprise) and a bar. (What? A bar?? In Wisconsin???)
Actually there were two bars.
Our (unofficial) big town motto was Eat, Drink and Be Saved.
The phrase "Blink and you'll miss it" didn't apply due to the 90 degree curve in the road. Driving eastbound, you couldn't blink or you'd run directly into a bar we affectionately called the Plywood Palace. If you were coming from Ashland and heading west, you didn't dare blink to miss the town or you'd drive smack into the wall of the cheese factory and knock over the Virgin Mary's blue bathtub.
If you grew up in the upper Midwest, you know exactly why Mary needs a bathtub and what shade of blue it is.
...which was located in the next town, across the street from our rival high school.
We were rebels, I tell ya.
Stay tuned for the next post where I'll show you the Plywood Palace.
You're not going to believe it.
Well, you might, if you're from Wisconsin, eh.
Saturday, June 20, 2009
Laura Beach Creations
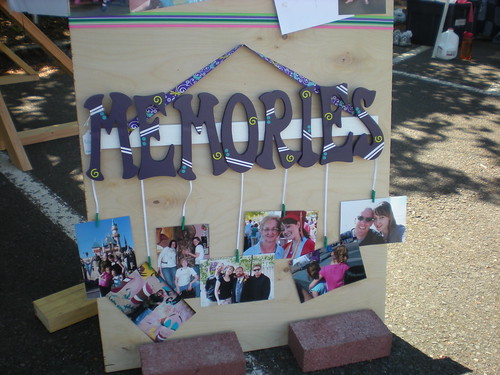
Memories, originally uploaded by Adventures of Pam & Frank.

Friday, June 19, 2009
Chicken Packages
I'm going to copy an idea I used last Xmas when I made up some seasoned chix breasts as a gift for my dad. We vacuum sealed 6 breasts with 3 different seasoning blends. I figured it would be an easy way for him to cook a meal or two worth of meat at a time, with sodium-controlled seasoning. He really liked the gift.
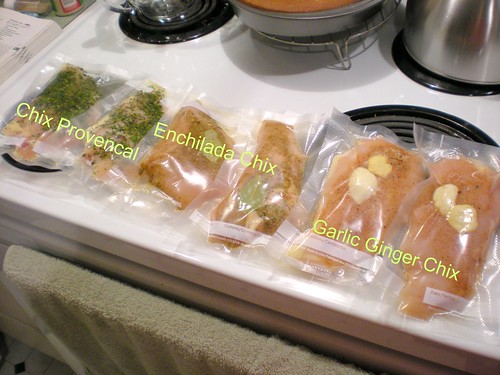
Six Vac-sealed Seasoned Chix Breasts, originally uploaded by passitonplates.
I figured I'd like to show you what I'll be doing in case you want to try it too.
First, you need a vacuum sealer for food. We call this appliance a "Food Sucker." A Vac Sealer (or Food Sucker) sucks all the air out of food packages as they're sealed to prevent the food from getting freezer burn. We like to buy meat in bulk then separate the package into vac seal bags and freeze the meat in smaller portions.
My brother in law likes to vac seal marshmallows, fresh tomatoes, and raw potatoes. We don't recommend vac sealing soft or raw food. He will probably die of embarrassment if he reads this. While you can imagine what happened with the marshmallows and tomatoes, I won't tell you what happened with the potatoes.
...it smelled really bad...
Ok, so here are the basics for seasoning and sealing 3 different varieties of chicken breasts.
- Set aside a plate or pie dish per seasoning blend (listed below)
- Mix each set of seasoning blend ingredients into its own plate. The herbs and spices are listed below but you can decide how much seasoning you want to use. I like my seasoning on the heavy side, so I would mix up about 1 Tbs of seasoning per chicken side = 4 Tbs for 2 chicken breasts.
- Dip each side of the raw chicken breast in your prepared seasoning blend.
- Place the breast a vac seal bag, then seal it.
- Freeze in a single layer in the freezer and use within 6 months.
Seasoning blends:

Garlic Ginger Chix, originally uploaded by passitonplates.
This is Garlic Ginger chicken.
Mix the following seasonings to taste:
- granulated onion
- smoked paprika
- black pepper
- granulated garlic
- fresh garlic, either to taste or to make it look pretty, like I did
- ginger
- cumin
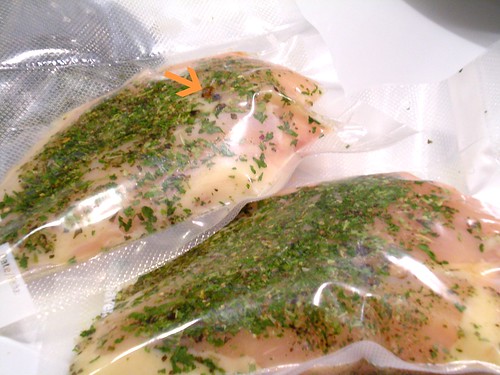
Chicken Provencal, originally uploaded by passitonplates.
- oregano
- thyme
- rosemary
- tarragon
- parsely
- lavender
- cracked black peppercorns
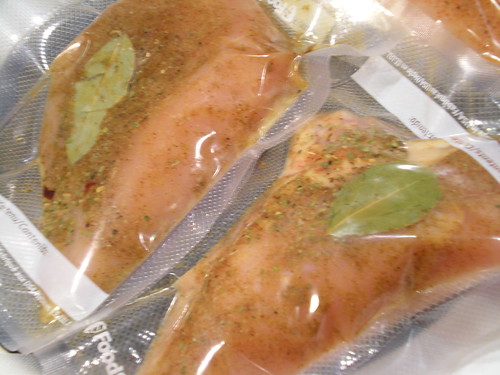
Enchilada Chicken, originally uploaded by passitonplates.
This one is Enchilada Chicken - everything I throw in the pan when I make Chix Enchiladas:
- oregano, crushed dried and ground
- granulated onion
- granulated garlic
- chili powder
- freshly cracked black pepper
- red pepper flakes
- lots of cumin
- after the chicken is in the bag but before sealing, add about a tsp of lime juice
- and dress up each breast with a bay leaf
When it's time to cook them, thaw the chicken, slide them out of the bag into a hot pan or baking dish, and cook until they have an internal temperature of 160F or until juices run clear.
Thursday, June 18, 2009
Wednesday, June 17, 2009
...Get Set...
Saturday, June 13, 2009
Spooning in the garden
Anyway, a couple weeks ago, in May, we had another birthday. remember? I showed you the boxes we gift wrapped. Next one is mid to late June, then mid July, mid August, early September, three in October, three in November, then Christmas.
Whew!
So anyhoo, I was poking around Etsy for gifty ideas and came across a sweet idea from Monkeys Always Look. I thought you'd like to see these charming vintage upcycled garden markers.
(Oh. And my birthday is in October, so you still have time to shop for me...)
Friday, June 12, 2009
Spiffied up CD jewel case liners
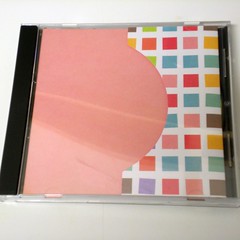
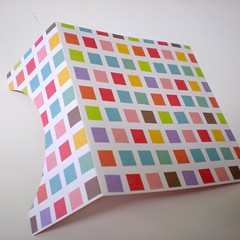
Here is a nifty CD case insert
Originally uploaded by passitonplates
Boring and Bland are my enemies. Their evil plan is to make life as boring as possible, and we just can't have that now, can we?
Whenever possible I try to foil their evil plan... with as little time and effort as necessary.
Maybe I'm cheap and lazy. No, don't try to be nice. I admit it. I am cheap and lazy.
I take great pride in my easy craft projectss and love making all kinds of fabulous stuff for cheap. (wink!)

And it's fun on the inside, too
Originally uploaded by passitonplates
See?
Fun fun fun on both sides of the insert.
Yeah, I'm thinking those "design your own CD case insert" programs are awful and my printer is not that great. This is faster, easier, better-looking, and I can do it when it's someone else's turn on the home computer.
See? Tell your mother it's not a such bad thing to be lazy. And when you admit to her that you're cheap, be sure to point out you mean financially. Not . . . the other kind of cheap.
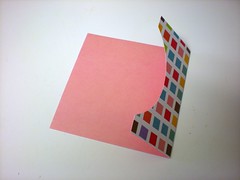
The paper has designs on both sides
Originally uploaded by passitonplates
This was so easy and looked so great that I made a bunch and then scoured the house looking for more vacant CD cases to spiffy up.
Ok, ready? Here's how to make yours:
1. Select a sheet of two-sided scrap booking paper that you want to use for this project. Decide which side will be shown when the case is closed and which side will be shown when the case is open.
2. Fold the sheet of paper, making sure that the paper on at least one side of the fold is as large (or larger than) the CD jewel case.
3. Align an existing CD insert with the folded edge of your scrap booking paper. Using the CD insert as your template, and a really light touch with your pencil, trace around the remaining 3 sides of the CD insert.
4. Cut along your traced line.
5. Embellish as desired. I traced the shape of the CD on the front and cut it out.
6. Slide into place.
Ta dah!
Now poke through the house looking for more boring CD jewel cases to spiffy up.
You know you want to.
Thursday, June 11, 2009
Scrabble time, literally
This clock made me smile.

Either this classic game was rejected by its owner because the letter distribution was a little off (there's just one letter X per game) and nobody could think up that many words containing the letter X... or the ladies at Two Cheeky Monkeys found a place to buy extra letters.
All of Pam's parents are big Scrabble players and I bet any one of them could use up three Xs and five Vs in a single game, but most people would give up after the words Axe, Xray, Live or Love, and Evil.
Although you could use Vex, and on a triple word bonus that's what? ...a 42-point, three letter word?
Not bad.
Of course, when it's time to play Scrabble, you'd have to keep score in this book.


Wednesday, June 10, 2009
Get ready...
Tuesday, June 9, 2009
Flickr Album Covers
 Here's something to kill about a half an hour or so...
- Go to a random page in Wikipedia by clicking here:
http://en.wikipedia.org/wiki/Special:Random
The first random Wikipedia article that shows up is the name of your band. - Get a random quotation by clicking here:
http://www.quotationspage.com/random.php3
The last three to five words of the very last quote of that page is your album title. - Go to flickr by clicking here:
http://www.flickr.com/explore/interesting/7days/
Click on the third picture, no matter what it is. Scroll down and look on the right, under Tags, to make sure you don't see this symbol with the copyright info.If you don't see it, this picture will be your album cover. If you do see it, the picture's copyright excludes it from this game. Just go back and hit refresh/reload to repeat this step.
- Use photoshop or similar to put it all together. (I use www.picnik.com)
(This next one is creepy, isn't it?)

 Let's see yours! Post one (or more) to your blog then comment here with the URL to your post. You can copy these instructions to your post, too.
Can't wait to see what you come up with!

Saturday, June 6, 2009
Twigmeister Twig Furniture
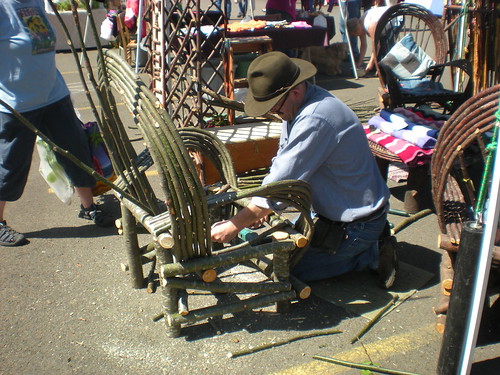
This guy was making a chair as people watched. Very neat. I've always loved twig furniture. Now it makes me want a house with a front porch even more than ever, so I would have a place to put one of these twig chairs.
This guy is smart, too. When I asked for permission to photograph him for my blog, he said, "Ok, but link me." Absolutely.
This guy is the Twigmeister at www.Twigmeister.com
This was taken at the Salem Saturday Market on May 30, 2009

Friday, June 5, 2009
Yesterday's storm
Thursday, June 4, 2009
Craigslist ad - want a hamster cage?
Besides, maybe you're interested in some crap from our garage?
Sure you are.
Here is exactly how this item is listed on Craigslist:
We got this critter trail cage for Paul The Hamster a while back. Paul's now in a different cage, and this neat hamster haven is available to you.
The cage has tubes for your little critter to crawl around and you can get parts to add on and make a maze of tubes as big as you want. There are two missing parts that we cannot locate, though. There is a green ball that sits on the opening at the top of the cage, and the water bottle goes in the smaller opening. You can pick up these parts at any pet store (we got the original cage from PetCo or Pet Smart, I can't remember which.)
If you already have some tubes and parts, this would be a great second cage that your hamster could crawl to.
Oh, and for free, we'll throw in the black rubber band around the little space pod sticking up at the top of the cage. Paul figured out how to open it up and got out one night while we were sleeping. Our dog showed us Paul's hiding spot when we got up the next morning, and it took one more escape before we humans figured out what the problem was. Lucky for you, we've already retrofitted the space pod with the rubber band so it's not also an escape hatch!
You're probably looking at the pictures and wondering about the blue ball and running wheel. We're adding those as a bonus to you. The blue ball has a locking cap so you can put your critter in it, click the cap on, and watch your hamster roll around the house. This is a lot of fun and keeps your critter safe from the dog or cat or ... from getting lost! The ball fits small to medium hamsters - a large hamster would need to bend his little body to fit in here, which eventually turned out to be big Paul's problem.
The running wheel is one of those silent types. Ok, it made a little clicking noise, but we were able to keep it in the kiddo's bedroom at night and she was not kept awake by that annoying squeaky wheel. You can fit the wheel in this cage or add it to any other hamster cage.
One last note: we sanitized all of these pieces by soaking them in a bleach solution then running them through the dishwasher, so they're all nice and clean and ready for use.
Asking $20 OBO for the set shown in the pictures.


